What is Nmap?
Nmap (shortened for "Network Mapper") is a popular free network discovery tool on the market. Over the last decade or so, the application has evolved as a standard tool for network administrators wishing to map out their networks and undertake large network inventories. It enables users to locate active hosts on their network systems and search for open ports and operating systems. This post will teach you how to install and use Nmap.
Nmap operates on a command line similar to Windows Command Prompt, but a GUI interface is available for more advanced users. When employing Nmap scanning, the user simply enters commands and runs scripts through a text-based interface. They can move across firewalls, routers, IP filters, and other systems. Nmap was built for enterprise-scale networks and can scan thousands of connected devices.
Nmap's primary uses are port scanning, ping sweeps, OS detection, and version detection. The application uses IP packets to identify available hosts on a network, as well as the services and operating systems they use. Nmap is available on a variety of operating systems, including Linux, FreeBSD, and Gentoo. Nmap also features a highly active and vibrant user support community. In this tutorial, we'll go over the foundations of Nmap to help you get started quickly.
Network Analysis and Packet Sniffing with Nmap
Network analyzers, such as Nmap, are critical to network security for various reasons. They can identify attackers and test a network's weaknesses. When it comes to cybersecurity, the more you understand your packet traffic, the better prepared you will be for an attack. Actively scanning your network is the best way to ensure that you are always prepared for future assaults.
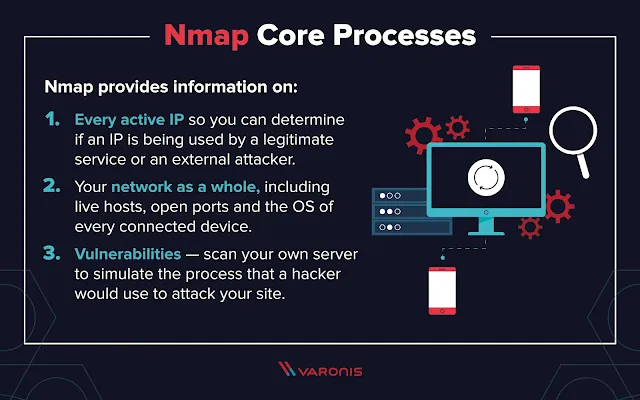
Nmap is a highly versatile network analyzer and packet sniffer. For example, it enables the user to scan any IP address on their network. If you come across an IP address you've never seen before, you can use an IP scan to determine whether it's a legitimate service or an outside attack.
Nmap is a popular network analyzer among administrators because it provides a variety of tasks for free.
Nmap Use Cases
For example, you can use Nmap to:- Identify live hosts on your network
- Identify open ports on your network
- Identify the operating system of services on your network
- Address vulnerabilities in your network infrastructure
How to Install Nmap
Before we get into how to use NMap, let's look at how to install it. Nmap is available for download here for Windows, Linux, and Mac OS.
Install Nmap on Windows
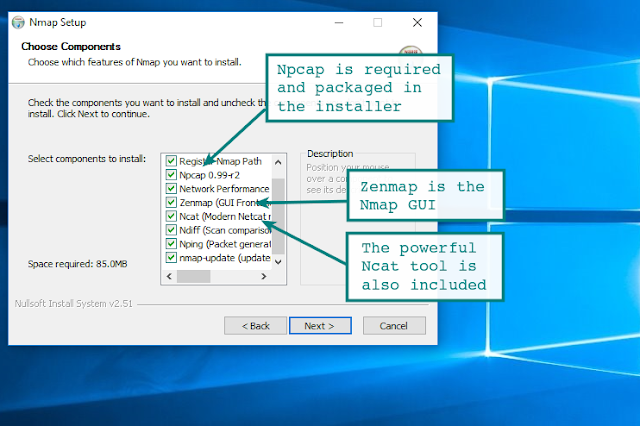
Use the Windows self-installer (referred to as nmap-<version>setup.exe) and then follow the onscreen instructions.
Install Nmap on Linux
On Linux, you have the option of installing the source code or one of several binary packages. Installing Nmap on Linux enables you to write your own commands and run custom scripts. The nmap --version command can be used to determine whether nmap is installed for Ubuntu. If you receive a notice stating that nmap is not currently installed, enter
sudo apt-get install nmap
into the command prompt and press enter.
Install Nmap on Mac
On Mac, nmap offers a dedicated installer. To install on Mac, double-click the nmap-<version>.dmg file and open a file called nmap-<version>mpkg. Opening this will start the installation process. If you’re using OS X 10.8 or later, you might be blocked by your security preferences because nmap is considered an ‘unidentified developer’. To get around this, simply right-click on the .mpkg file and select Open.
How to Run a Ping Scan
Identifying active hosts on your network is a fundamental aspect of network administration. On Nmap, this is accomplished by performing a ping scan. A ping scan (also known as the discover IP's in a subnet command) enables the user to determine whether IP addresses are online. It can also be used for host discovery. ARP ping scans are one of the most effective approaches to detect hosts on LAN networks.To run an ARP ping scan, type the following command into the command line:
# nmap -sp 192.100.1.1/24
This will return a list of hosts that have responded to your ping requests, as well as the overall number of IP addresses. An example is shown below.
It is vital to note that this search does not send any packets to the specified hosts. However, Nmap performs a reverse-DNS resolution on the listed hosts to determine their names.
Port Scanning Techniques
When it comes to port scanning, you can use a variety of different techniques on Nmap. These are the main ones:
- sS TCP SYN scan
- sT TCP connect scan
- sU UDP scans
- sY SCTP INIT scan
- sN TCP NULL
Newer users will seek to address the majority of problems with SYN scans, but as your understanding grows, you will be able to use some of these other strategies as well. It's worth noting that you can only use one port scanning method at a time.
TCP SYN Scan
sS TCP SYN Scan
The TCP SYN Scan is one of the quickest port scanning techniques at your disposal on Nmap. You can scan thousands of ports per second on any network that isn’t protected by a firewall.
It is also a useful privacy-preserving network scanning approach because it does not complete TCP connections that might bring attention to your activity. It works by transmitting a SYN packet and then waiting for a reply. An acknowledgment implies an open port, while no answer indicates a filtered port. An RST or reset identifies non-listening ports.
TCP Connect Scan
sT TCP Connect Scan
When the user is unable to execute a SYN scan, the TCP Connect Scan is the primary alternative. Under TCP connect scan, the user makes a connect system call to connect to the network. Instead of examining packet answers, Nmap makes this call to obtain information about each connection attempt. One of the most significant downsides of a TCP connect scan is that it takes longer to target open ports than a SYN scan.
UDP Scan
sU UDP Scan
If you wish to perform port scanning on a UDP service, UDP scans are your best option. UDP can be used to scan ports on your network, including DNS, SNMP, and DHCP. These are very significant because they are an area that attackers frequently target. You can execute a UDP and SYN scan at the same time. When you perform a UDP scan, you send a UDP packet to each target port. In most circumstances, you are sending an empty packet (save for ports 53 and 161). If you do not receive a response after transmitting the packets, the port is considered open.
SCTP INIT port scan
sY SCTP INIT Scan
The SCTP INIT port scan supports SS7 and SIGTRAN services and uses both TCP and UDP protocols. Like the Syn scan, the SCTP INIT Scan is extremely quick, scanning hundreds of ports per second. It is also an excellent option if you want to protect anonymity because it does not complete the SCTP process. This scan sends an INIT chunk and waits for a response from the target. A response that includes another INIT-ACK chunk indicates an open port, whereas an ABORT chunk indicates a non-listening port. If a response is not received after several retransmissions, the port will be marked as filter.
TCP NULL Scan
sN TCP NULL Scan
A TCP NULL scan is one of the more sophisticated scanning techniques at your disposal. This works by exploiting a flaw in the TCP RFC that defines open and closed ports. Essentially, any packet that does not contain SYN, RST, or ACK bits will elicit a response, with a returned RST if the port is closed and no response if open. The main advantage of a TCP NULL scan is that it allows you to bypass router filters and firewalls. Although these are a fantastic alternative for stealth, intrusion detection systems (IDS) can still detect them.
Host Scanning
The host scan is the most effective method for identifying active hosts on a network. A host scan is used to send ARP request packets to every device on a network. It will make an ARP request to a specific IP within an IP range, and the active host will respond with an ARP packet including its MAC address and a 'host is up' message. You will receive this message from every active host. To perform a host scan, enter:
nmap -sP <target IP range>
This will raise a screen showing the following:
Identify Hostnames
One of the simplest and most helpful commands is -sL, which instructs nmap to perform a DNS query on your preferred IP address. Using this method, you can obtain hostnames for an IP address without sending a single packet to the host. For instance, use the following command:
nmap -sL 192.100.0.0/24
This gives a list of names associated with the IPs scanned, which can be quite valuable for determining what specific IP addresses are used for (if they have a corresponding name!).
OS Scanning
One of Nmap's useful functions is OS detection. To determine a device's operating system, Nmap sends TCP and UDP packets to a port and analyzes the responses. Nmap then performs a variety of checks, ranging from TCP ISN sampling to IP ID sampling, and compares the results to an internal database of 2,600 operating systems. If it discovers a match or fingerprint, it displays a summary including the provider's name, operating system, and version.
To detect the operating system of a host, enter the following command:
nmap -O 192.168.5.102
It is important to note that you require one open and one closed port in order to use the –O command.
Version Detection
Version detection is the name given to a command that allows you to determine the software version a computer is running. What distinguishes it from most other scans is that the port is not the center of its search. Instead, it attempts to determine what software a computer runs by examining the information provided via an open port. To employ version detection, type the -sV command and choose your preferred IP address, for example:
#nmap -sV 192.168.1.1
Increasing Verbosity
When running any scan through Nmap, you might require more information. Entering the verbose command -v will provide you with additional details on what Nmap is doing. Nine levels of verbosity are available on Nmap, from -4 to 4:
- Level -4 – Provides no output (e.g. you won’t see response packets)
- Level -3 – Similar to -4 but also provides you with error messages to show you if an Nmap command has failed
- Level -2 – Does the above but also has warnings and additional error messages
- Level -1 – Shows run-time information like version, start time, and statistics
- Level 0 – The default verbosity level that displays sent and received packets as well as other information
- Level 1 – Same as level 0 but also provides detail on protocol details, flags and timing.
- Level 2 – Shows more extensive information on sent and received packets
- Level 3 – Show the complete raw transfer of sent and received packet
- Level 4 – Same as level 3 with more information
Increasing the verbosity is great for finding ways to optimize your scans. You increase the amount of information that you have access to and provide yourself with more information to make targeted improvements to your network infrastructure.
Nmap Scripting Engine
If you want to get the most out of Nmap, then you’re going to need to use the Nmap Scripting Engine (NSE). The NSE allows users to write scripts in Lua so they can automate various networking tasks. A number of different script categories can be created with the NSE. These are:
- auth – scripts that work with or bypass authentication credentials on a target system (such as x11-access).
- broadcast – scripts typically used to discover hosts by broadcasting on the local network
- brute – scripts that use brute force to gain access to a remote server (for example http-brute)
- default – scripts set by default on Nmap based on speed, usefulness, verbosity, reliability, intrusiveness, and privacy
- discovery – scripts that search public registries, directory services, and SNMP-enabled devices
- dos – scripts which can cause denial of service. Can be used to test or attack services.
- exploit – scripts designed to exploit network vulnerabilities (for example http-shellshock
- external – scripts that send data to external databases such as whois-ip
- fuzzer – scripts that send randomized fields within packets
- intrusive – scripts that risk crashing the targeted system and being interpreted as malicious by other administrators
- malware – scripts used to test whether a system has been infected by malware
- safe – scripts that aren’t considered intrusive, designed to exploit loopholes, or crash services
- version – used under the version detection feature but cannot be selected explicitly
- vuln – scripts designed to check for vulnerabilities and report them to the user
The NSE can be quite complicated to get your head around at first, but after the initial learning curve, it becomes much easier to navigate.
For example, entering the command -sC will allow you to run the platform's common scripts. If you want to run your own scripts, use the -script parameter instead. Remember that any scripts you run may do damage to your system, so double-check everything before running scripts.
Now you Know almost everything about Nmap. Use this Knowledge to explore the endless possibilities with Nmap & Network Security. But Remember to Always Act Responsibly & Carefully.
Stay Informed, Stay Safe!


